Nov 28, 2012

MULTI VEG PORIYAL

            I was planning to post this because it is one of the healthiest poriyal. We can also call this as "TRI COLOR poriyal". The only tough thing in this poriyal is chopping of vegetables finely. If you are ready with it you can do it immediately. This goes well with Sambar, Rasam or even you can use as side dish for chappati. I will mix this poriyal with hot rice and eat as such. Here the recipe goes on                      

INGREDIENTS

CARROT
2 Cup
BEANS
2 Cup
CABBAGE
2 Cup
BIG ONION
1 No
TURMERIC POWDER
A Genorous Pinch
RED CHILLY POWDER
1 Tbsp
CORAINDER POWDER
2 Tbsp
SALT
To Taste

To Temper

MUSTARD
1 Tsp
URAD DHAL
1 Tsp
CURRY LEAVES
Few
OIL
1 Tbsp

STEP BY STEP PROCEDURES 

Chop the veggies,onions finely

In a Pressure cooker/Kadai add the items to temper and then add Onion. Fry it till it turns golden brown.

Then add all the veggies and cook till it is soft

Add salt
If you don't like spicy poriyal, then you can stop your cooking here and have the poriyal as such.

Now add Turmeric powder,Red chilly powder,Corainder powder

Sprinkle some water. 

Close it with a lid until it is cooked

Take care so that it does not get burnt at the bottom.Stir it at regular intervals. It will get cooked soon since the veggies has been finely chopped.

Transfer to a serving bowl.You can granish with corainder also

I had some left over chappatti.so I made the chappatti into bits & pieces and mixed with this spicy poriyal.

NOTES
  • If you like  ginger & garlic flavour,you can add while tempering.
  • Vegetables is purely your choice.
  • You can keep this poriyal and make masala Dosai/Idly
  • You can use as filling for Samosa

KEERAI KOOTU


                       As I have already told I love Kootu a lot. During my school days itself I will ask Keerai Sadam for my lunch. My brother will run off on seeing Keerai and dishes made out of Keerai. The cleaning of Keerai is a tough job for my mom. So I clean Keerai for her. But as of here we get only frozen Spinach (Keerai). My job became easier. Twice a week i will surely prepare Keerai Kootu. With frozen keerai we cannot prepare keerai poriyal. This is a tasty & healthy Kootu.

INGREDIENTS


KEERAI
1 Big Bunch(I used frozen keerai)
MOONG DHAL
½ Cup
BIG ONION
1 No
TURMERIC POWDER
A Generous Pinch
SAMBAR POWDER
1 Tsp
SALT
To Taste

To Grind

COCONUT
¼ Cup
JEERA
½ Tsp
DRY RED CHILLY
1 or 2
RAW RICE (or) RICE FLOUR
½ Tsp

To Temper

MUSTARD
1 Tsp
URAD DHAL
1 Tsp
OIL/GHEE
1 Tsp

STEP BY STEP PICTURES


 Soak the Moong Dhal for 10 mins.Allow water to boil in a vessel & add Moong Dhal.Cook until it becomes mushy.    
                                             

Then add the Keerai. If you have fresh Keerai wash it out well and chop it roughly.

Soak raw rice for 10 mins.Take the items given under the table to grind in a mixie jar.Grind to a paste with water.

Pour the grounded mixture over the Keerai.Add Salt  & bring it to boil.(You can add a pinch of sugar to retain the green color of Keerai)


Now transfer to serving bowl


Heat oil/ghee in a kadai.Add onions and fry it until it turns brown


 Now drop the fried onions in the Keerai Kootu


Yummy Keerai Kootu is ready. It will be delicious with hot rice &  ghee.

VAZHAKKAI/ RAW BANANNA PORIYAL

 
                 This is a easy poriyal which can be made in no time.It goes well with Drumstick sambar which has a nice flavour. I got this recipe from Rak's kitchen. Some may avoid vazhakkai due to gastric issues. For them you can use Asafoetida more to avoid gastric issues. Coming on to the recipe

INGREDIENTS

VAZHAKKAI
1 No
SAMBAR POWDER
1 Tbsp
BIG ONION
1 No
TURMERIC POWDER
A Genorous Pinch
COCONUT  GRATED
3 To 4 Tsp
SALT
To Taste

To Temper

MUSTARD
1 Tsp
URAD DHAL
1 Tsp
CURRY LEAVES
Few
ASAFOETIDA/HING
A Little
OIL
1 Tsp

STEP BY STEP PICTURES
Remove the outer skin of vazhakkai and cut into cubes. Keep immeresed in water (Add few drops of buttermilk in water).Wash it nicely to remove the stickness of Vazhakkai . Chop the onions.

Boil Vazhakkai with enough water. Add Sambar powder,Turmeric powder,Salt. Don't overcook it.

Drain the water and keep aside

In a Kadai add the items to temper.Then add the onions.Fry it for 2 min

Now add the cooked vazhakkai,Stir it until it is dry.Add coconut gratings & switch off the flame.

It's ready to eat

Nov 26, 2012

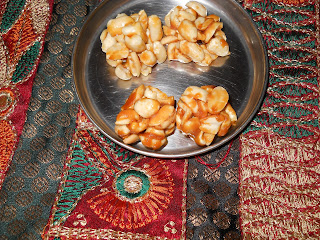
KADALAI URUNDAI


           I am sure tomorrow entire Tamilnadu will be lightened by the clay lamps inspite of power problem. My childhood memories for Karthigai Deepam was quite interesting. In our house we had many arches and in the terraces we used to light up the clay lamps. Every year my mom used to buy some type of akal vilaku and add to her collection. She keeps that in practice so her collection goes on increasing. She has all types such as Mud lamps, Clay lamps, Scented pine apple candles,etc. In the evening around 4 pm she starts up with the work. She waits till Thiruvannamalai deepam has to be lighten up. She will be watching the live telecast of Thiruvannamalai deepam on TV and then only she lights all the lamps. My duty is to watch & add oil to all the lamps, so it  is continuously lighted till we go to sleep. Me and my brother will see which house looks beautiful by walking through the street. Those Days cannot be got back.

INGREDIENTS

PEANUTS
¾ Cup
JAGGERY
¼ Cup
CARDAMOM
A Pinch
GHEE
To Grease Your Hands


STEP BY STEP PICTURES

Dry roast the peanuts until brown spots appear 

Remove the outer skin and just split the Peanuts

Remove the impurities from the Jaggery by adding little water and allow it boil . Transfer the Jaggery syrup  in a non stick pan/kadai and allow it to boil again.

Now its time to check the consistency.  Take water in bowl and drop a bit of Jaggery syrup. If the drop does not dissolve and it stands firm, then try to roll it out into a ball. If you are able to make a soft ball then this is the first stage. Keep for few mins and again check if you are able to make a hard ball. This is the correct stage.

Add the Peanuts and give a stir. Grease your hands  with ghee and make balls.While it is warm make balls .As time goes and when it cools down you will not be able to make balls. So heat up a little for the Jaggery to melt and make balls.

This is the first time i am trying to make this Peanut balls.So i could not form balls when it was hot. My aim was to post this recipe for KARTHIGAI DEEPAM


Nov 25, 2012

TOMATO PACHADI

            
                        While I was surfing in Aarthi's blog, I came across this Pachadi. It caught my eyes immediately bcoz of its simple ingredients. A big thanks to Aarthi. It was so easy to prepare. So i am sharing this receipe. The comment given by my Hubby after tasting this Pachadi is "It is like a Pulicheri (kerala dish)". He was born and brought up in Kerala. So he likes Kerala Dishes a lot. I got a Thums Up from my Hubby.The credit goes to the Owner of the Site YUMMY TUMMY.
Here goes the receipe


INGREDIENTS

BIG ONION
1 No
TOMATO
4 No
CURD
1 Tsp
COCONUT
½ Cup
GREEN CHILLY
1 No
SALT
To Taste
SUGAR
A Pinch
OIL
1 Tbsp

To TEMPER

MUSTARD
¼ Tsp
URAD DHAL
¼ Tsp
JEERA
¼ Tsp
ASAFOETIDA/HING
A Pinch
DRY RED CHILLY
1 No
CURRY LEAVES
Few


STEP BY STEP PICTURES

Take Coconut & Green Chilly in a mixie. Grind it to a fine paste 

 Chop Onions & Tomatoes

 In a kadai heat oil and add Onions

 Followed by tomatoes

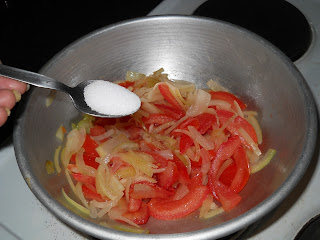
 Add Salt


 Add Sugar

 Cover with lid & cook it until the tomatoes are mushy


Now add the  grounded paste

 Allow it boil until oil separates

 
 Allow it to cool and add curd

Now its time to temper

                    Tomato pachadi is ready                          

Super cool


 It can be served with Chappati & Paratha